I never had a real tea party as a child. My Barbies certainly might have, but personally I never had the pleasure
of dressing up in fancy clothes, eating delectable miniature desserts and drinking tea while talking in a British accent.
of dressing up in fancy clothes, eating delectable miniature desserts and drinking tea while talking in a British accent.
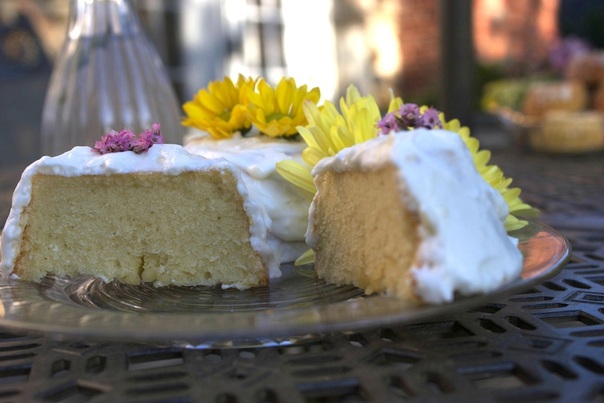
These cakes are my way of trying to remedy that. They are moist and sweet with just the right amount of rosemary,
and the frosting is simple and sweet. I refrigerated mine for awhile before eating, and with summer beginning
these will make a perfect treat for any outdoor party.
and the frosting is simple and sweet. I refrigerated mine for awhile before eating, and with summer beginning
these will make a perfect treat for any outdoor party.
The Ingredients
For the cake:
For the frosting:
- 2 sticks (1 cup) butter
- 2 teaspoons ground rosemary
- 1/2 teaspoon baking powder
- 1/4 teaspoon salt
- 1 cup granulated sugar
- 1 Tablespoon light corn syrup
- 3 eggs
- 3 teaspoons sour cream
- 1 teaspoon vanilla
For the frosting:
- 1/4 cup heavy whipping cream
- 1/4 stick of butter
- 2 cups powdered sugar
The Recipe
- Pre-heat oven to 350 degrees Fahrenheit. Grease cupcake pan with butter or vegetable shortening. The cakes pictured were made in a large sized cupcake pan, however medium sized will also work.
- Melt 2 sticks of butter in a microwave or in a saucepan on low heat. If using a microwave, melt the first stick completely in a microwave safe bowl before adding the second stick. Set melted butter aside to cool.
- In a separate small bowl, mix together rosemary, baking powder, and salt.
- Using an electric mixer, combine sugar, light corn syrup, and melted butter.
- In a separate medium sized bowl, whisk eggs, sour cream, and vanilla until smooth. Pour this into the electric mixing bowl and mix until fully incorporated, and then add the dry ingredient mixture (step 3). Mix until the batter becomes smooth and creamy, with a light yellow texture. Roughly five minutes.
- Pour the batter into the pan and place in oven for 25-30 minutes, depending on your oven strength. My oven is a little tricky at times, so it took a while for mine to bake as the batter is rather thick.
- While the cake is baking, wipe out your electric mixing bowl. Once clean, mix butter and whipping cream on low for 2 minutes, gradually increasing speed as they combine.
- Slowly incorporate powdered sugar until the mixture has the creamy, frosting like texture. It took me roughly two cups to achieve frosting level, but the recipe will work with more, depending on your taste.
- Refrigerate frosting until cakes are baked and fully cooled.
The Decoration
Once my cakes were cooled, I nudged them out of the pan and placed them on a metal baking sheet. They had puffed up a little at the tops, so using a pairing knife I carefully cut the excess puff off, to achieve a flat bottom when I flipped them over. I think this excess cake could be used nicely for cake balls - a possible future post? We will see.
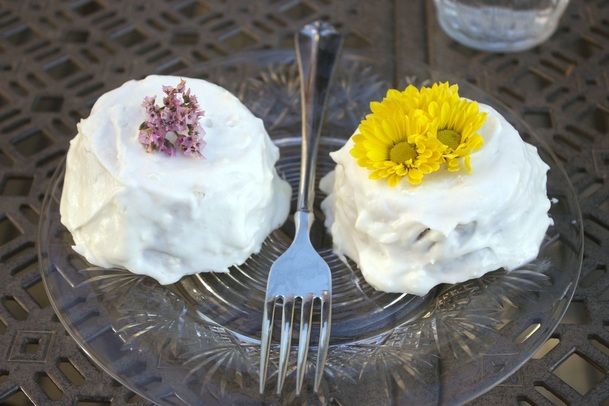
After trimming my cakes down to the size I wanted, I made sure they were thoroughly cool to the touch, and then frosted them. I moved them from the metal baking sheet to the crystal plates above. While this certainly isn't necessary, if you're going for a nice aesthetic, I picked out some brightly colored flowers and cut them off their stems and then gently pushed them into the cake. Obviously the flowers weren't edible, but it was a fast and easy decoration that was easily removable.
After frosting my cakes, I also placed them in the freezer for roughly 15 minutes. The recipe will taste fine without doing this, but since the frosting was already chilled I thought it would taste better to balance the temperatures more, which it did!

Thank you for reading, and I hope this recipe serves you well! Links to check me out on Tumblr, Instagram, and Twitter are to the right and I would love it if you left any comments/questions below.